Pepperoni Pizza Bake

Happy Friday everyone! So glad it's the weekend and what is a weekend without pizza? I came by this Pepperoni Pizza Bake one night when I wasn't sure what to make for dinner. I went to my trusted source: Pinterest. I typed in a few ingredients I had in my fridge and it sent me to the Pillsbury site to this awesome recipe!


(16 1/3 ounce) can Pillsbury Grands refrigerated buttermilk biscuits                                               
1 (8 ounce) can pizza sauce
2 cups shredded mozzarella cheese (8 oz.)
16 slices pepperoni (1-1/2-inch)
Italian sausage crumbles- These weren't part of the original recipe, but I had bought them to put on a homemade pizza, and this worked just as well!
  1. Cut each biscuit into 8 pieces; toss with pizza sauce and 1 cup of the cheese.
  2. Spread in greased 8" square (2 qt.) glass baking dish
  3. Top with pepperoni and remaining 1 cup cheese.
  4. Bake at 375 22-28 minutes or until golden brown and bubbly.
At first I only cut them into 1/4ths. But after checking the directions again I saw it said 1/8ths so I cut them down a little more.


After you grease your pan, and toss your biscuits in the sauce, you just put everything together.
 

Pretty soon you pull this deliciousness out of the oven.
 

Another quick and easy dinner that you could make tonight! Give it a try!

Happy weekend everyone!
 

Chocolate Eclair Cake

Who loves Éclairs like I do? They are a treat that I hardly ever have, but I love! I remember loving them since I was a kid- and one time when my girlfriend and I went to Las Vegas I had the best éclair! Sadly, I don't remember which hotel it was at (the Venetian, maybe?) but it was absolutely amazing!

So I've been wanting to try this Chocolate éclair cake for a while and it was totally worth it.


  • 1 (3.5 oz) package of instant Vanilla pudding
  • 1/2 of a container of Cool Whip (thawed)
  • 1 1/2 cups milk
  • graham crackers
  • 1/2 tub chocolate frosting
  1. Mix together milk, cool whip and pudding. In a square 8x8 or even a 9x9 put a single layer of graham crackers. You might have to break them in half to make the fit.
  2. Put half of the mixture over the crackers then add another layer of crackers.
  3. Next add another layer of pudding and then top with the last layers of crackers.
  4. Cover with plastic wrap and place in the fridge for a half hour.
  5. After pudding has time to set up, remove from the fridge.
  6. Take lid off of frosting and put into microwave for about 15-20 seconds. Just enough to soften it up.
  7. Pour frosting over pudding mixture and spread evenly.
  8. Cover and place back in the fridge.
When I found this recipe on Pinterest it said to let it sit a full day and even better, overnight. I did and this is a recipe that gets better the longer it sits so I recommend letting it sit AT LEAST over night! The flavors blend the longer it sits and even though you have to look at it in the fridge every time you open the door, it'll be sooo worth it, I promise!

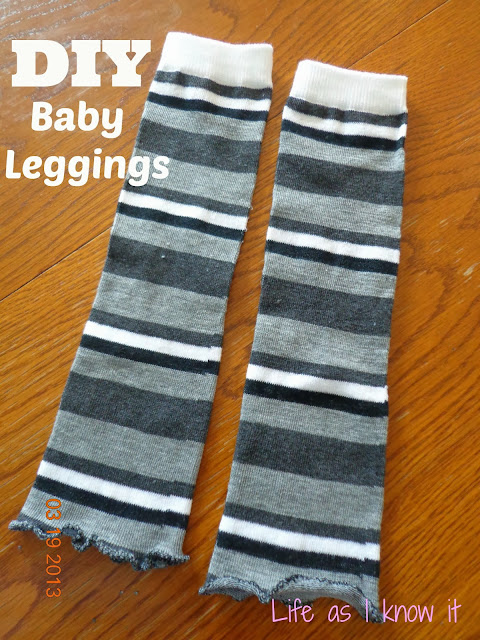
DIY Baby Legs

Well over a year ago I did a guest post for a blog friend of mine and I shared these DIY Baby legs. And I thought I'd finally share them here.


Babies have adorable clothes, but sometimes they need more than a little onesie to wear around the house. And I'm sure we've all see the adorable baby legs you can buy. But lets be real. They are kinda pricey! When I saw them I totally thought I could make them. I mean, I hadn't used a sewing machine since about 7th grade during Home Ec, but I figured it can't really be that hard! (right???) So my mom came over and gave me a crash course in using the sewing machine I had bought about 7 years before, but had never used!

And I got right to work! This is what I started with:


I bought these knee high socks at Target for $1.50. And I got a few pairs that were clearanced out for just $1. Then I cut off the tips of the toes and the ankle. I did that because the tutorial I was using made a little cuff for the bottom, but I ended up deciding to skip that step! My daughter wasn't going to know the difference anyway!


Then I used a zig zag stitch and ran it through slowly, pulling it real tight. That is what's going to give you that cute little ruffle.


And here we have it. Easy peasy!
 
You've just made your first pair of baby leggings! And I'll tell you this, Target has so many cute pairs of these socks, that it gets a little addictive. So enjoy!

Summer is two!

Two years have passed and I can't even begin to know where that time has gone. It feels like just yesterday I was introducing Summer to everyone!


Summer is such a smart and sassy girl and just full of energy! When she is happy, she is SO happy! And when she is mad, she is SO mad! (She'll even growl at you!)


Here are a few more facts about Summer on her 2nd Birthday:

She loves getting her nails painted
She loves showers, baths and any water I'll let her get in.
She talks like crazy, and says so many words/sentences that I can't even keep track.
She loves to give kisses and hugs
She loves to swing and be outside.
She loves to eat. This girl doesn't miss a meal!
She loves to yell down the stairs for "Zachary!"


She finally stopped nursing right at 23 months. And even though I'm glad that we are done with that phase, a little tiny part of me misses it. Though we get lots of other "us" time together too.

She is an "In your face" kind of girl. She loves to be up close, skin to skin, and always touching when she is tired. It doesn't matter where we are, if she is tired she will lift up my shirt so she can lay on my belly.


You are an amazing napper. Sometimes you will sleep for 4-5 hours if I'll let you. And it doesn't matter if you sleep a long time, or a half hour, you don't typically go to bed until 9:30-10 and you are right back up at 6:30. As soon as you hear Dad start the shower you want in the bathroom!

You sleep with us every.single.night.  Ya, I'm working on this one. You sleep wonderfully in your bed at nap time but when it comes to bedtime you want nothing to do with your room. Soon you will have your own room and I will be working hard to break this habit.

Another habit I look forward to breaking is the binky. You love it and sleep with it but I think we can get rid of it easily. (Famous last words, right?)

You are still pretty tiny. You might look "chubby" but you are still wearing mainly 18 month clothes. Leggings are fine, but 18 month jeans are still (way) too big.

You are doing so good with potty training! You decided a couple of months ago that you wanted to use the potty and have been doing great since. It's rare to change a poopy diaper and you wake up dry most mornings. I look forward to the day of no diapers!

You are such a big girl, with so much spunk. You are your own girl and don't let people boss you around! I look forward to what the future holds for you and I hope for lots of wonderful years ahead!


Happy Birthday Sweet Girl. We sure love you!

DIY: Home made envelopes

Ok, so this post is over a year in the making. I'm not sure why it's never actually gotten published, but it just hasn't.

Last year for Summer's birthday I made these envelopes because I couldn't find any that I liked for her hand made 5x7 invitations.  Yes, Summer will actually be two tomorrow, that is how old this post is, but forget that- Look how cute this is!


I started with a piece of scrapbook paper, a cutter, a ruler and some paper glue. And also, whatever size invitation you have.

Measure around your invitation or picture, etc. that you have. Then I gave a 1/4 inch allowance on the ends of long way of the invitation for the pieces I was going to be gluing.

Next, I cut out each envelope. This was the most time consuming part, but it still went pretty quick!

Then I did a test run to get the folds just how I wanted and then measured it out so I would know the basics for the rest. By the end I wasn't measuring anymore and just folding because I had made so many. Then put your glue along the two 1/4 inch pieces and then fold up the piece from the bottom.

That pretty much sums it up. I added my invitations to each envelope and put a little more glue on the lip of the envelope to seal it up!

Lastly, I printed out address labels to stick on the front, added a stamp and sent theme on their way.


 Pretty cute, right?


What kind of crafty things to do you like to make?


Freezer Meals

Over the last few years I have really come to love cooking, but that doesn't mean that I always have time to put together a fabulous meal for my family.  That is why I love freezer meals.  Every once in a while I get a wild hair to do a bunch of meals and get them in the freezer, and I'm always so glad I did. So I really want to start making this a more regular thing in my house.

In the Summer we are so busy with activities, and it's hot and I don't want to use my oven too often.  And during the school year we are so busy with activities and homework, and school stuff that I have even less time. Not to mention I can't get a good natural light picture in the winter for the life of me.

And while I've made freezer meals in the past, and you can find them here, these are the first I'm sharing for a series based solely on Freezer Meal Planning.


Here is what I made for this round:

Crockpot Chicken Philly's

Goulash x2

Teriyaki Chicken

Spaghetti sauce x2

Mini muffin omelettes (toddler breakfast) x12 muffins

Spaghetti cups (toddler lunch) x 12 muffins

Corndog muffins (toddler lunch) x 18 muffins

Banana muffins x 18 muffins

For this first round of freezer meals I looked all over Pinterest to find the ones I knew my family would really love, and more importantly, that they would eat! And other than the Philly's and the spaghetti sauce, we had not eaten any of these before. And most of these came from Ring Around the Rosies amazing freezer planning posts.

I was really happy with all of them and would make all of them again- with a couple of adjustments.

Do you Menu Plan? Make Freezer Meals? What are some of your favorite?


Mini Omelettes

You guys, I know I am sharing recipes on days other than Foodie Friday, but I have so many fun recipes that I want to share, and Friday just can't come fast enough! Actually, it's coming too fast, but you get what I mean, right? But today I wanted to share these fun mini omelettes. I mean, how cute are they? And you can make them to fit your style and just exactly what you like. You can eat them by themselves, or put them on an English muffin and make a sandwich out of them!

However you want to eat them works, but just give them a try.

  • 8 eggs
  • 1/2 c milk
  • Additional veggies/meat to your liking. (I just added green pepper, onion and cheese)
  1. Preheat oven to 350 and line cupcake pan with foil liners
  2. Mix everything together and scoop into liners
  3. Bake about 20-25 minutes, until done 
  4. Remove liner to reheat

These fun mini omelettes couldn't be any cuter and easier to make. And they taste great! Even thawed they taste like they just came out of the oven after about 30 seconds in the microwave.

Recipe adapted from Ring Around the Rosies

Home made Spaghetti Sauce

If you are like my family you probably love spaghetti. We probably eat it about once a week, though I do mix it up a little. Sometimes with meatballs, sometimes with sausage, sometimes cooked inside garlic bread, or maybe even baked, but we eat it. A lot. Another thing that varies, is my spaghetti sauce.


I'll admit that back in the day I used to open a jar of spaghetti sauce and dump it over cooked noodles call it spaghetti. But these days I make something that looks a little more like this:


Now I find a lot of creative ways to get veggies into our meals. And even though the kids are actually all good veggie eaters, it never hurts to find other ways to get our servings in, because lets face it, we probably still don't get enough.

2 lbs. ground beef or ground turkey
2 cans/jars of your favorite sauce
1 can of diced Italian tomatoes
1 can of stewed Italian tomatoes (You could use two of the same instead)
4 cloves garlic, chopped
1 onion, chopped
1 Bell pepper, chopped
2 cups zucchini, chopped
1 cup of basil, chopped
Italian seasoning to taste
salt and pepper to taste

I brown the hamburger then add the seasonings.
Next I add all my chopped ingredients and last the sauces.

Last, I divide the sauce into two gallon size freezer bags. Lay flat to freeze.

This makes a large amount of sauce and I use it for everything. Spaghetti, regular lasagna, crockpot lasagna, whatever. It's delicious. If you have a smaller family you could easily make this into 3 or 4 separate bags because depending what I am making I will get 2 meals from each bag of sauce,


When it's time to use your sauce put into crockpot on low for 3 hours to simmer. Serve over fresh pasta.


Cool Whip Banana Pudding - Simple snack recipes

This shop has been compensated by Collective Bias, Inc. and its advertiser. All opinions are mine alone.

Happy Monday everyone! I hope that you all had a great Labor Day weekend and got to do something fun. Travis and I spend pretty much the entire weekend painting our living room and part of our entry way but still have a lot left to paint. We picked up enough paint that we'll soon be doing the kitchen, hall and the rest of the entry way and I'm excited as it's only taken us four years! But we finished the weekend with a nice BBQ with some family and that always makes it worth it. Now we are ready to start school today- I dropped Zach off for his first day of middle school this morning! I'm excited, as is Zach and I can't wait to hear about his first day when he gets home and we relax with a snack. Speaking of snacks, as a mom of three, I'm always looking for fun snack recipes. And boy, did I hit the nail on the head with this delicious Oreo banana pudding.

Kids desserts and quick and easy snacks are important in my house. I feel like someone is always saying, "I'm hungry" and having something that my kids like, and I'm okay with feeding them is a big deal. And come on, look at the picture below, who could pass up Cool Whip?


Luckily when I head to Walmart they have everything that I need. I can find the Cool Whip in one aisle and pudding in the next along with a few other ingredients and then we are ready to head home and make our after dinner treat.


Nice and simple after school snacks, or before bed snacks are my favorite.

1- container of Cool Whip
1- 6 oz package of Jell-O vanilla pudding
3- cups of milk
1- banana
oreo cookies

  1. Mix your vanilla pudding and milk

  2. Put crushed oreos in bottom of cup

  3. Next layer on sliced bananas, pudding and cool whip.

  4. Add a second layer and top with oreos

  5. Chill before serving


Enjoy! I know my kiddos sure loved this yummy snack! Just look at Summer! I think she likes it.


#AddCoolWhip #CollectiveBias

What do you think of this quick and easy snack? My kids thought it was delicious, as did I! I made a little bowl for myself and Travis, minus the cookies and it was pretty great. A easy after school snack is the way to go to hold your kids over until dinner. What are some of your favorite after school snacks?
Back to Top