Showing posts with label Recipes. Show all posts

Instant Pot Tuscan Chicken Pasta

Cooking meals in my Instant Pot is something I love to do. I still get a tiny bit nervous when trying a new Instant pot recipe and have had several fails or things I would do differently the next time I make it. But this Tuscan Chicken Pasta was super easy to make and it turned out great!

When I took these pictures it was the middle of winter so it gets dark around 4 pm and our lighting is terrible. Obviously.


  • 3 cup chicken broth (I typically use low sodium)
  • 1/2 cup tomatoes sun-dried without oil or grape tomatoes, halved
  • 1/2 tbsp Italian seasoning
  • 1 tbsp minced garlic
  • 2 lbs chicken breast diced into 1-inch cubes
  • 12 oz whole wheat pasta
  • 2 cups spinach
  • 3/4 cup plain Greek yogurt
  • 3/4 cup cottage cheese
  • 2/3 cup parmesan
  • 1 tsp dried
  • 1/4 tsp pepper
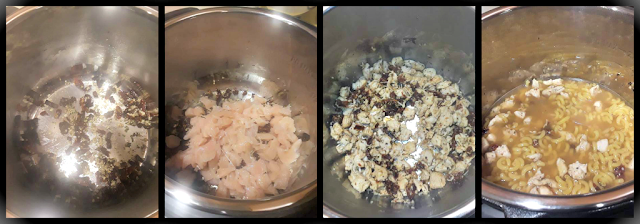
  1. Use sauté mode on your Instant Pot and add sun-dried tomatoes, garlic, Italian seasoning, salt, and pepper. Sauté for about 30-45 seconds.
  2. Add the chicken and then brown for 1-2 minutes, stirring to keep the chicken from sticking.
  3. Next, add the pasta and chicken broth to the pot. Stir to make sure pasta is covered.
  4. Put on the lib and turn the pressure valve to sealing. Use the manual setting and cook on high pressure for 4 minutes. When the time is up quick release
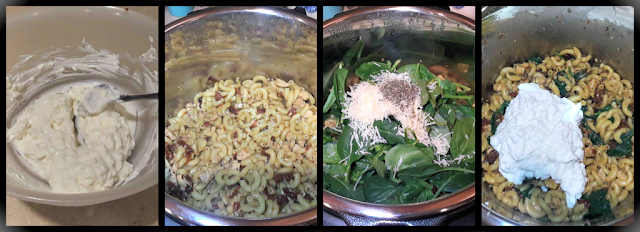
  5. While the pasta is cooking, blend together the cottage cheese and Greek yogurt to make a cream sauce. Set it aside until ready to use.
  6. Remove the Instant Pot lid and stir the noodles and pasta. While the pasta is still hot, add the parmesan cheese, spinach, and basil. Mix the pasta until the cheese melts and the spinach wilts.
  7. Pour the blended cream sauce over the pasta. Stir it until all the pasta is covered in sauce. Serve immediately.


Oreo Birthday Cake

This past year for Summer's birthday she decided she wanted to pick her cake from Pinterest. An who I am to tell the girl no when I get to try something new?!? So after scouring for an Oreo cake, she found this one and that is how we ended up with an Oreo Birthday Cake.


This birthday cake was amazing! And really fun to make. But first, I want to share where I found it.  QUEENSLEE APPETIT is the blog I got it from! And I think it is safe to say Summer loved it! (And her birthday was in September, so I am super behind on sharing this!)


It really was a process and I made the cakes on the day before and assembled them the day of her birthday.


This was actually the only picture of the inside of the cake! Darn It! It was already dark in my house by the time we ate cake and by the next day it was falling over because it was so heavy! So this is all you've got! But I promise it tasted good!


I'm not really a chocolate cake fan, but since this one had coffee in it, it worked for me! (Yes, I let my 7 year old have coffee cake!)


There is literally no way for me to share this recipe without copying it word for word because I followed her recipe step by step.  So instead, just go to her blog, QueensleeAppetit for the recipe.


Summer thought this cake was amazing, and she's not wrong! She was so proud that I was able to mostly duplicate it! 


This cake was insanely rich and I'll be honest, after the small pieces we ate on her birthday, we only ate a few small bites here and there. And afterwards, I ended up throwing the rest of the cake away because there is just no way we could eat another bite of it because it was just so sweet! Tasted amazing though!

Zero Point Cheesecake

Cheesecake is one of those amazing desserts that I love to love. I have made many versions of cheesecake over the years that were amazingly delicious, and I won't say that this is better than peanut butter or toffee filled cheesecake but this Zero Point Cheesecake is the best zero-point cheesecake I've ever had!


This cheesecake from Pound Dropper was actually super easy to make! It really needs to refrigerate at least overnight. Really, the longer the better.

And mix using a spatula rather than an electric mixer.


It was pretty thin, but the original recipe did say to use up to 5 cups of yogurt if you want it to be thicker and since it was the first time I was making it I just kept to the basics.


Once it chilled in the fridge overnight I finally got to give it a try. I decided to smash up a few blackberries to add on top with a little fat-free whip cream and it was perfect.


  • 3 large eggs
  • 3 cups nonfat plain Greek yogurt
  • 1  (1 oz.) small box instant Sugar-Free and Fat-free Cheesecake pudding
  • 1 Tbsp vanilla extract
  • 3 Tbsp sugar substitute (I used Swerve)

  1. Preheat oven to 350 degrees.

  2. Using a mixing bowl add eggs, sugar substitute and vanilla and using a wire whisk, mix well.

  3. Add yogurt then dry pudding, mix well.

  4. Lightly grease Springform Pan and pour the mixture into the pan.

  5. Bake for 30 minutes. (It will like it isn't done, but it is! And will set as it chills!)

  6. Cool for 20 minutes before covering it with plastic wrap

  7. Put in refrigerator and chill overnight.
I also tried her Mocha Chocolate Cheesecake and it was soo good! (It wasn't very pretty so maybe when I make it again I will share!)

This is zero points based on WW freestyle program. For other info on this zero-point cheesecake check out Pound Dropper - She has amazing recipes on her site!

Homemade Cherry Pie

Who doesn't love a delicious Homemade Cherry Pie? I know that we love it, but I hardly ever make them. So this year for Thanksgiving I decided to make one. I remember the last time I made cherry pie it didn't turn out so well. I didn't make a pretty crust and my filling boiled over the top and spilled all over the inside of my oven, burning.  What a mess, right?

This year I wanted to try a lattice top and I am not going to lie, I was so proud of myself. I thought it turned out beautifully.


I don't know if you remember that time that my dad and kids and I went cherry picking and I shared about canning cherries, but these are the last of them! We had an insane amount of cherries and I have made so many desserts from them, like pies, Cherry Turnovers and Cherry Ice cream.


My filling was simple to make, and it is the best filling

  • 5 (ish) cups cherries
  • 1/2 cup water
  • 2 Tbsp freshly squeezed lemon juice
  • 3/4 cup granulated sugar
  • 4 Tbsp cornstarch
  • 1/4 tsp almond extract
  1. Combine cherries, water, lemon juice, sugar and cornstarch in a medium pan on medium heat.
  2. Bring mixture to a boil then turn heat to low and cook for 10 minutes, stirring frequently.
  3. Add in almond extract.
  4. Pour into pie crust, adding a top crust over filling and pinch edges together.
  5. Brush an egg wash over the top of crust and sprinkle a small amount of sugar over crust.
  6. Bake on 350° for about 40 minutes.


If you are using a sweeter cherry, I would definitely cut back the sugar to at least 2/3 cup, otherwise, it is going to be extremely sweet. Since I used pie cherries, they're a bit more tart and need a little extra sugar. And I'd just use your favorite pie crust recipe. I feel like I have tried so many recipes over the years trying to find the perfect one for me.


When I took my pie out I was giddy with excitement! I thought my Cherry Pie was so pretty and I couldn't wait to eat it!


After Thanksgiving dinner, I couldn't wait to dig into my pie. Summer and I both wanted a piece right away and a sliced into it, then took a big bite!

You can imagine my disappointment when I bit into a cherry pit! I was so embarrassed! I then had to tell my entire family to beware if they had a piece of homemade cherry pie that they don't break a tooth!

And I couldn't believe that of all the cherries I have used over the last couple of years, of all the treats I have made with them, this pie was full of cherry pits! Everyone that had a piece ended up with a pit! So don't do what I did and let your kids help with the pitting! (Kidding, stuff happens!)

Despite the mishap, I still thought my Homemade Cherry Pie was pretty and it tasted delicious! What is your favorite way to eat cherries? Pie is becoming a fast favorite for me!

And make sure to check my Instagram for other recipe favorites!

Frozen Yogurt covered blueberries

Snacks are one of those things that can be really hard when you are trying to eat healthy and take care of yourself. It is so easy to grab unhealthy choices, like chips, crackers, etc because they are right there in front of you. But what if you make some snacks ahead of time so that you can't fail? What if you have them prepped and in separate bags so that you can grab a bag as you head out the door so you are tempted to stop through a drive-thru? These frozen yogurt covered blueberries will be perfect for just that!

Today I wanted to share a super quick and delicious snack that I have been loving quite a while. Really since I had started with weight watchers back in March of 2018 I started making these frozen yogurt covered blueberries and I have just made them ever since!


There isn't really that much with these blueberries. I used Light and Fit strawberry cheesecake flavored greek yogurt and dipped each blueberry into the yogurt. Then I placed them onto a lined cookie sheet and then into the freezer just until they are frozen.

Once frozen I put them into a sealable baggy and I keep them in the freezer. If you don't the yogurt melts pretty quick!

Two Ingredients:
blueberries
Light and fit Strawberry Cheesecake Greek yogurt

  1. Dip blueberries in yogurt
  2. Line dipped blueberries onto a covered cookie sheet
  3. Place in freezer until frozen
  4. Keep in the freezer when not eating as they will melt
So simple and delicious and ready in a short amount of time! What are you waiting for, make these now!

Now I have shared with you one of my favorite snacks, I'd love for you to take a moment and leave me a comment below about some of your favorite go-to snacks to keep you on track when you are trying to make a better you!

And don't forget to check out my Pinterest for other ideas!

Zucchini Parmesan Chips

Oh my lanta, another zucchini recipe! Are you thinking that? It is okay if you are because I sort of feel the same. But I have so many zucchini recipes that I just need to get them shared before they sit in my drafts for a year! And I still have zucchini coming out of my ears thanks to Summer's awesome Girl Scout garden from this year so I am trying to use it up!  Anyway, Have you ever had Zucchini Parmesan Chips? They are so good and are by far, one of my favorite ways to eat zucchini.


One of my favorite things about Zucchini Parmesan Chips is that my kids love them! Once I take them out of the oven they get devoured in a matter of a few minutes. They are a perfect, fun snack and I would definitely recommend eating them while they are nice and warm, because they are better that way!

They are so incredibly easy to make and in a matter of minutes, you are eating a delicious snack!


I love cooking them and then turn the oven to broil for a moment to get the cheese nice and crispy. It is SO delicious!


  • 1 medium zucchini sliced thinly
  • 1 tsp olive oil
  • 1/2 teaspoon Italian seasoning
  • salt & pepper to taste
  • 1/4 cup shredded parmesan cheese

  1. Slice zucchini thinly for easy baking
  2. Toss with olive oil
  3. Add seasonings and stir to coat
  4. Layout sliced zucchini on a cookie sheet and sprinkle with cheese
  5. Cook for 5 minutes on 425°
  6. Turn oven to broil and cook just long enough to brown cheese
  7. Enjoy!


These Zucchini Parmesan Chips are delicious! What is your favorite way to eat Zucchini?

If you need more zucchini recipes, search "Zucchini" in the search bar, or check out these recipes ---> Zucchini Oat Cookies and Zucchini Tots. And don't forget to check my Instagram for more delicious recipes!


Cherry Ice Cream

One of our favorite things to do in the summer is to make our own homemade ice cream. Use an ice cream machine? No way! Who has time for that?? This Cherry Ice Cream is from scratch in less than 24 hours, with no machine!


Several years ago I found a recipe where the blogger promised ice cream with no machine. And I was all about that! I made my own version of a coffee ice cream with peanut butter, chocolate syrup and coffee and it was heavenly.

So naturally, I had to try other flavors, yes? Like Moscato Ice Cream. I promise this tastes as amazing as it sounds. I have made this one many times along with other flavors because there are just so many options!

Here we go ---->
I blended my heavy whipping cream, added cherries

IMG_20160714_121436

Then added some pureed cherries and the condensed milk

IMG_20160714_123102

Then I folded it all together until it was blended perfectly.

IMG_20160714_123253

Once it was blended I added it to a freezer-proof plastic container that has a tight lid fit on it. I say to freeze it for 24 hours, but depending on your freezer it might be less than that or it could be longer.

IMG_20160714_123433

2 cups of Heavy Whipping Cream, cold
1 can Sweetened Condensed Milk
1/2 c of fresh, pitted cherries
1/2 c of fresh, pitted cherries, blended

  1.  Start with mixing your heavy whipping cream, blending until you have stiff peaks.

  2. Add in your condensed milk and cherries along with the blended cherries and mix until they are well blended.

  3. Pour into a freezer-safe container with a lid.

  4. Freeze for approx 24 hours. (It could be less depending on how cold your freezer is)

  5. Enjoy!


IMG_20160715_151613

IMG_20160715_151627

You could easily add some other ingredients to this as well. Chocolate syrup? Pistachios? Brownie? What would you add to your homemade cherry ice cream?

Baked Chicken Artichoke Pasta

Summer will forever and always be my favorite season.  But there is something about heading into the fall and making casseroles again, like this Baked Chicken Artichoke Pasta, without the worry of heating up the house!  That is one thing I have enjoyed about my Instant Pot is that I can eat casserole type food without the house getting hot!

But now that summertime is winding down and the Fall season is approaching, all of my casserole recipes are coming out to be made.


This Baked Chicken Artichoke Pasta is easy to make and worth every step.


I love that it is such a comfort food. The chicken, sauce and artichokes all blend so well together that it makes for a perfect meal.


And who doesn't like cheese?


One thing I love is making sure the top of the cheese gets nice and crispy! That is a favorite of mine!


2 Tbsp olive oil, divided

1/3 c diced onion

salt an black pepper

4 cloves garlic, diced

1lb diced boneless, skinless chicken breasts

1 tsp Italian seasoning

12 oz rigatoni pasta

3 Tbsp butter

3 Tbsp flour

pinch of nutmeg

3 c. milk

1 c. grated Parmesan cheese

12 oz artichoke hearts, quartered

1 c shredded mozzarella cheese


  1. Preheat oven to 400°

  2. In a skillet heat a tbsp of oil on medium heat and add onions.

  3. Season with salt and pepper, cook 5 minutes, stirring often.

  4. Add garlic and saute until fragrant. Set aside in a bowl off heat.

  5. Season the chicken with salt and pepper.

  6. In the same skillet heat another tbsp of oil over medium heat and add the chicken. Cook through, stirring every few minutes so all sides get browned. Remove from heat.

  7. Cook pasta in water.

  8. Make the sauce in a medium saucepan by melting the butter over medium heat.

  9. Whisk in the flour, cooking about 3 minutes, whisking constantly.

  10. Slowly whisk in milk, bring to a simmer for 3 minutes, whisking constantly.

  11. Turn down heat to low, add in nutmeg, 1/2 tsp salt, 1/8 tsp pepper and the parmesan cheese. Turn off heat.

  12. Butter a 9x13 casserole dish.

  13. Drain pasta and put it back in the pan.

  14. Toss the chicken, Italian seasoning and onion/garlic with the pasta.  Add 3/4 of the sauce to the pasta and stir well.

  15. Pour into the casserole pan and spread out evenly.

  16. Spread the artichokes evenly over top then spoon the rest of the sauce over them. Sprinkle on the mozzarella.

  17. Bake 40 minutes until bubbly all over and golden on top. Allow it to sit for 5 minutes before serving.


I always love a good white sauce over pasta! What is your favorite way to eat pasta?

How to freeze Zucchini

Lately, I have come into an abundance of Zucchini, and I am not complaining. My family eats a lot of zucchini and this year we haven't gotten much from our plant. Luckily, Summer's Girl Scout troop had a garden and it has had an amazing zucchini turn out! But now I am over here working on how to freeze zucchini so that none of it goes to waste!

Zucchini

Look at those huge plants! I have never seen a garden quite like this come from 6 little girls! The tomatoes and Zucchini have literally taken over, but we are gobbling it up as fast as we can!


I love being able to pull out a bag of zucchini in the middle of winter and make zucchini bread, or cookies. And I dice up a lot of it to put into my spaghetti sauces and even the kids gobble it up. I mean, what kids don't love zucchini cookies when they also have chocolate chips in them?


It seems to work best to freeze your grated zucchini in 2 c increments as most recipes seem to call for that. And frozen zucchini doesn't break apart easily.  You could also slice it and freeze it. I would lay it out on a cookie sheet and do a quick freeze before putting the slices into a freezer bag. Then it will be a little easier to take apart when you are ready to use them. (Just be prepared for the extra water they carry once you do unfreeze them!)

Another great way to freeze it is after you cook it in something! I tend to make large batches of spaghetti sauce and add in zucchini. Or zucchini cookies, Zucchini Lasagna, zucchini bread, zucchini cake, zucchini tots- So many things you could make and freeze for later! What are your favorite ways to eat zucchini?
Back to Top